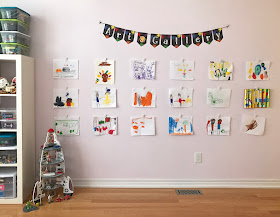
For me there is nothing more annoying then rushing at dinner time and having to deal with a fridge cluttered with drawings. Every time you open the fridge paper falls off, magnets go flying and your tiny artist comes running in to save and re put up their master pieces all under you feet. So I had to get a handle on it and remove the art display area from the kitchen to a place out of the way that the kids would love and would feel like their master pieces were still being admired and loved.
I decided the best way to show case their art and have them feel like its still being admired was to make a art gallery they can change out with new pictures when ever they feel like it. The best place for it in our home was the playroom to add some color to our bare playroom walls.
The Materials I used to make the art gallery wall were:
• 3M Command 3 Spring Clips (I LOVE THESE!!)
• 3M Command Clear Hooks
(Bonus about Command products they are easily removed from the wall and don't leave holes or damage!)
• Twine
• STANLEY Wall Laser Level
(This is the only Laser Level I will recommend using but not in the way they suggest in the instructions, read below to find out why)
• Green Painter's Tape
• FREE PRINTABLE ART GALLERY BANNER
Printed on Card stock. Click here to get the FREE printable banner or visit my Freebies page

• 3M Command 3 Spring Clips (I LOVE THESE!!)
• 3M Command Clear Hooks
(Bonus about Command products they are easily removed from the wall and don't leave holes or damage!)
• Twine
•
(This is the only Laser Level I will recommend using but not in the way they suggest in the instructions, read below to find out why)
• Green Painter's Tape
• FREE PRINTABLE ART GALLERY BANNER
Printed on Card stock. Click here to get the FREE printable banner or visit my Freebies page
Once you have gotten all your supplies you can start taping out the wall you have chosen to put the art gallery on!
Before I start the step by step instructions on how to make your own kids art gallery wall display, I wanted to explain why I only use the Stanley Wall Laser Level. First I use to own the black and decker pump hands free laser level but it never once suctioned to the wall like it claimed it was suppose to. It would for random seconds, 5 seconds here 12 the next time etc and then it would fall hard straight to the floor. Unfortunately while using it in the kitchen it fell off the wall and crack a kitchen tile. So it went straight into the garbage. Then I looked around for another brand but they all need to you to do more damage to your wall then needed because they all attached by a pin you had to shove into the drywall. So every time you used it you were putting extra holes in the wall from attaching the level to the wall. The Stanley Laser Level comes with an attachment piece to use this pin system as well but that part is removable. I never use the pin system that came with the Stanley laser level and instead I use mac tac on the bottem. It my make every contractor reading this scream but it saves having millions of little holes all over the wall and it works great for projects I am using it for!
Alright on to the art gallery! The first step is to figure out how many rows of command clips and how many per row you want to put up. I did 3 rows and 6 command clips per row. First you need to run the tape lines horizontally. The first tape line I put up I got my oldest to come over and I made it as tall as him. I knew I was only going to do 3 rows of command clips so they just had to be tall enough for the oldest to reach up and the bottom be not to close to the floor so I decided 16.5 inches was the perfect width. Once the first tape line was up I measured 16.5 inches and then made the next tape line and same for the last line I measured 16.5 inches again and I had my 3 rows!
Then I started at one end and measured 16.5 inches and started making the vertical lines to make a grid to use to make sure the command clips all line up the same.
Once you have done that and made as many vertical lines as you need you will have a grid that looks something like the picture below. Then follow the instruction of the command clips. I put my sticky strips all on first. I put them in the corner where the vertical meets the horizontal lines of tape as you can see below. Then I removed the tabs off them and put the command clips on the strips and pressed hard.
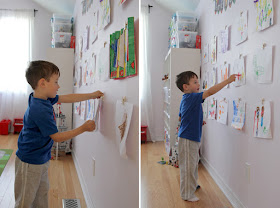
Once all your command clips are on you can remove the tape carefully from the wall and let you child come decorate their art gallery! My middle one Terror could not wait to put up all his art off the fridge!
The command clips are perfect for little hands to open and put their art in for display.
Then all you need to do is cut out the FREE PRINTABLE ART GALLERY BANNER, string it with the twine and hang it up above the art gallery! I used the clear command hooks to hang it up.
Your little ones will love having a special spot they can display their artwork and change it up when ever they feel like it! I know mine do. They also love being able to explain to us what each drawing is and the story behind it!
Such a super proud kid of his art display!


Hello. Would you consider making and mailing me this art gallery banner? How much would you charge?
ReplyDeleteHi There you can find this banner for free to download at my TpT store https://www.teacherspayteachers.com/Product/Free-Classroom-Decor-Printable-Art-Gallery-Bunting-3614027
Delete